• Advertisement

Make a small donation to Ye Olde Inn!

Donate via Paypal

Every cent received goes toward Ye Olde Inn's maintenance and allows us to continue providing the best resources for HeroQuest and Fantasy Gaming fans.

Q10 Flee the Darkness: A New Found Enemy (part II)

Quests for the HeroQuest 25th Anniversary Quest Pack.
Forum rules
Please follow this format:

Post Subject: Q#. "Title" by "Author"

First Post: Map + Quest Notes

Following Posts: Public discussion.

Q10 Flee the Darkness: A New Found Enemy (part II)

Postby Anderas » October 10th, 2018, 4:58 am

Okay.
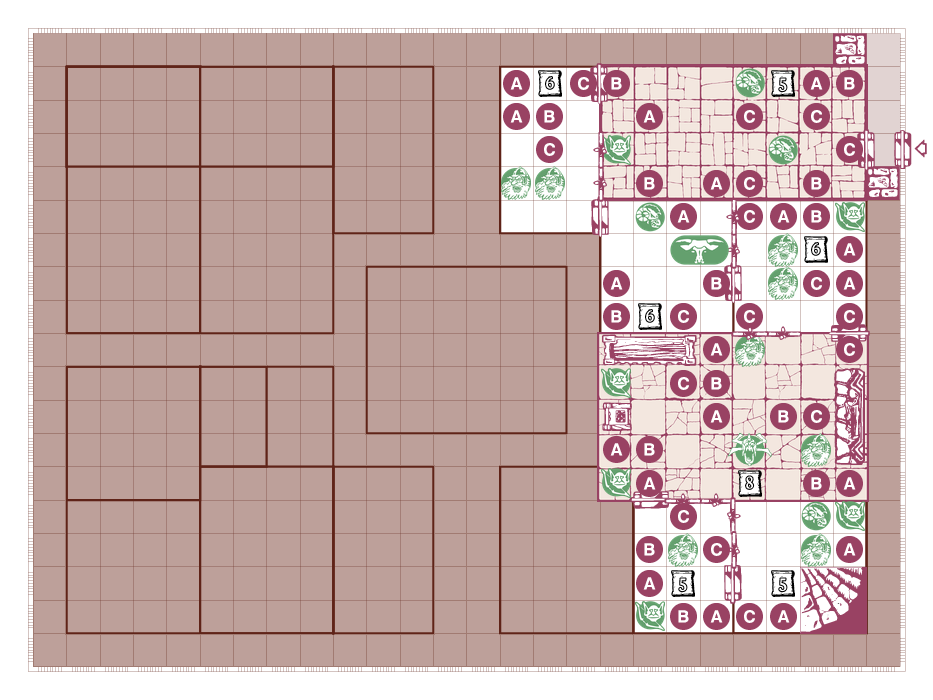
That's my first rough try for a crumbling dungeon.

Basically, there are three steps of crumbling, A, B and C, and they come turn-after-turn, some random time after you enter the room. I took care that no ways will be blocked forever and there is always a free square to move to. It will be difficult enough without death traps.

Findings: We have no properly visible numbers in Heroscribe, for Heroquest, so I resorted to Dwarf Quest numbers because they are still visible even when the room is completely crowded with Symbols. :-)

This posting is best viewed if you have installed the fonts HQModern, Gaze and Heroquest.

I did not yet balance the quest, but as it shall be playable directly after Q9 without visit to the armoury, it will have :skull: :skull: :skull: difficulty once I have balanced it.

Needed material: 8x4 room and 8x5 room from the HQ25 material; broken wall tiles, chaos dwarves, beastmen, minotaur, gargoyle, goblin archers. Some counters, to count the time.

The Map
Image

Q10 - New Found Enemiers Part II wrote:
A Quest for Heroes with at least 3 dice[/font]
Flee the Darkness!
After disabling the earth magic, you now hear a deep rumbling. Stones fall from the ceiling everywhere. Your way back is already becoming blocked. Find a way out before it is too late! Flee!


Notes:
Play this Quest directly after the last Quest. Body and Mind Points are fully restored, but Heroes may not visit the Armory.
Squares marked with the letters A, B and C represent where the ceiling caves in. These work like a falling block traps but with a different trigger. Note: A Hero needs to roll only one die for damage if he is hit by falling stones. Don't place the broken walls during setup.

At the beginning of each of your (Zargon's) turns after a room is first entered by a Hero, place a skull tile next to it and roll a red die. Add in the count of the skull tiles and compare this result to the number of the room found on the map. If the die result is greater, the ceiling starts to crumble. Return the skull tiles for the room to the box.

Now place falling block trap tiles on all squares marked "A", using the rules for sprung falling-block traps. The turn after any "A" squares have been triggered, spring falling block trap tiles on all squares marked "B" and place the broken wall tiles for this room. On the next turn, squares marked "C" are also sprung. On the turns following that, any square that begins with a Hero or monster in it springs a falling block trap.

Once all Heroes are out of the room, it collapses and remaining monsters die. Place blocked square tiles within all exits and return any inaccessible tiles to the box.

The Gargoyle represents the King of Dawn. It has the stats of a normal Gargoyle. When he is killed, the Wand of Magic can be found by any treasure search in this room.

Wandering Monster in this Quest: The Hero loses 1 Body Point due to stones falling from the ceiling.


Yes that needs testing. Is the time limit too tight? Do the monsters successfully block all exits?

Last edited by Anderas on October 19th, 2019, 1:10 am, edited 6 times in total.


Rewards:
Hosted a Play-by-Post game. Played a turn in a Play-by-Post game. Created a Hot Topic. Participated in four (4) Miniature Exchanges. Participated in three (3) Miniature Exchanges. Zealot Miniatures: Twisting Catacombs Kickstarter Backer Destroyed a Zombie! Encountered a menacing Chaos Warlock!
User avatar
Anderas
NOT Andreas!

Polar Warbear
Polar Warbear
 
Posts: 3397
Images: 73
Joined: September 20th, 2014, 7:02 am
Forum Language: British English
Hero:
Evil Sorcerer: Morcar
Usergroups:
Wizards of Zargon Group Member Adventurers' Guild Group Member Artists Group Member Champion Group Member

Advertisement

Make a small donation to Ye Olde Inn!

Donate via Paypal

Every cent received goes toward Ye Olde Inn's maintenance and allows us to continue providing the best resources for HeroQuest and Fantasy Gaming fans.

Re: Q10 Flee the Darkness: A New Found Enemy (part II)

Postby Anderas » October 18th, 2018, 8:49 am

I did my first simulation in the Questimator for this quest, and it led to an update of the quest layout.

* I removed some monsters even though I would have liked to keep them! :) The monsters alone make 14 BP damage now.
* I removed many of the letters A, B, C, so that there shouldn't be more than four of each in any room; plus letters A tend to be in the front, letter C tend to be in the back.
* I made an annotation that heroes with a helmet roll only 1 die for damage from falling rocks. Otherwise the group gets up to 42 BP damage through falling rocks: with helmets, they get up to 14 BP damage.
* Theoretically it works now. It is ready for testing!

* It is also in mohawks overview sheet.

Note that the quest layout is deliberately kept small as it should be played on the same evening like the Dawn Key King quest.


Rewards:
Hosted a Play-by-Post game. Played a turn in a Play-by-Post game. Created a Hot Topic. Participated in four (4) Miniature Exchanges. Participated in three (3) Miniature Exchanges. Zealot Miniatures: Twisting Catacombs Kickstarter Backer Destroyed a Zombie! Encountered a menacing Chaos Warlock!
User avatar
Anderas
NOT Andreas!

Polar Warbear
Polar Warbear
 
Posts: 3397
Images: 73
Joined: September 20th, 2014, 7:02 am
Forum Language: British English
Hero:
Evil Sorcerer: Morcar
Usergroups:
Wizards of Zargon Group Member Adventurers' Guild Group Member Artists Group Member Champion Group Member

Re: Q10 Flee the Darkness: A New Found Enemy (part II)

Postby Anderas » October 22nd, 2018, 4:16 am

Playtest is finished.

All Healing spells were used, and bitterly necessary. Three potions of healings were also used up. The group lost in total 28 Body Points but lost no member. That's a personal record for me.
The Elf was going down at one time, but could be saved with a potion of healing.

Worst was that monsters tried to block exits so that the falling blocks would do the rest. It was three times on knife's edge.
It turned out well, but that's a bit too much for me: Those kinds of touch-and-go levels are good for Zombicide or other games where you don't build up a character, but for Heroquest it's a bit hard to have three times avoided the total party kill by just one die roll. I took this experience and changed the map in posting 1 accordingly; those situations can't happen too easily anymore.

This quest is now good to go!


Image
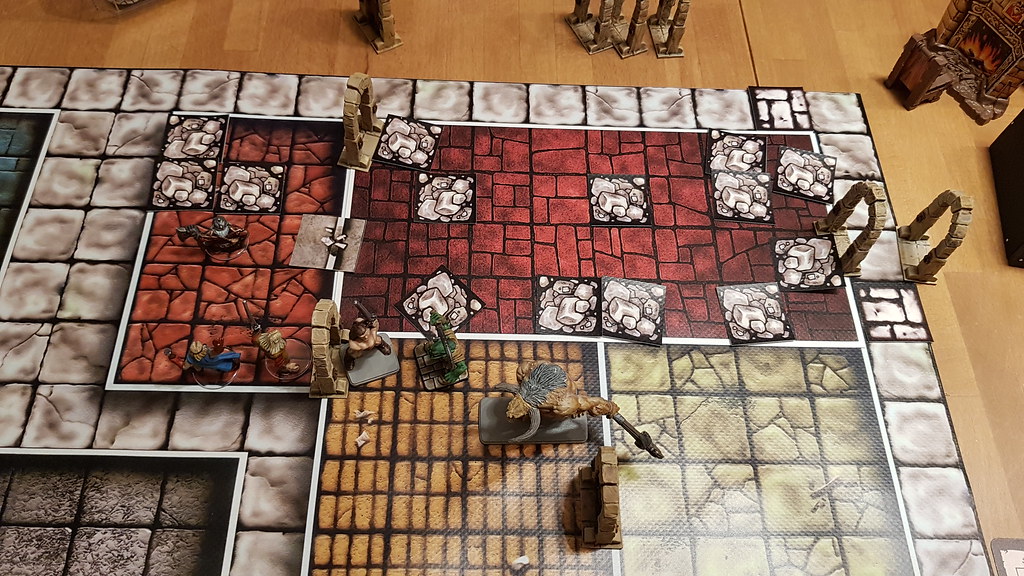
Heroes fighting my half painted Minotaur

Image
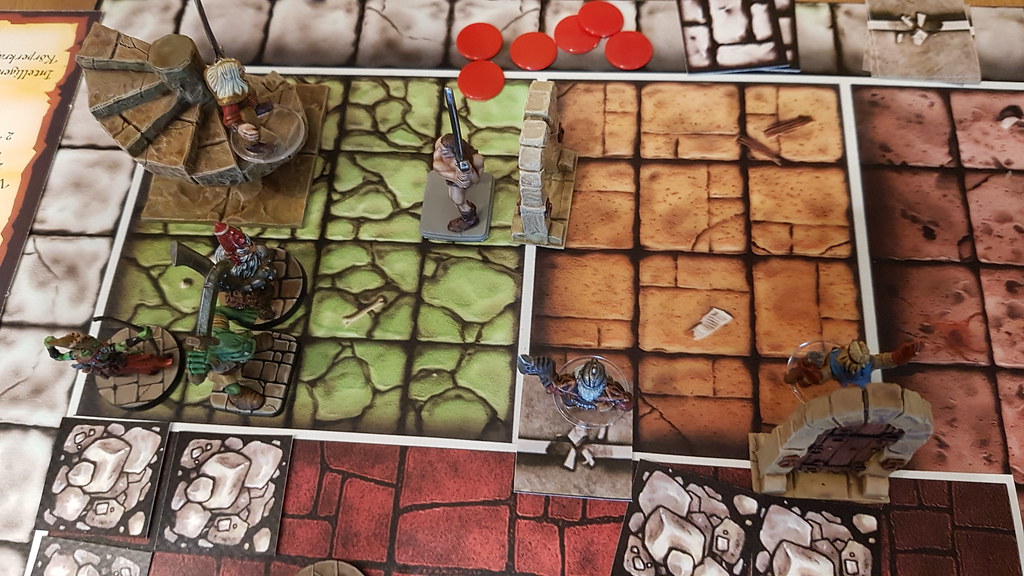
They made it. Barely. :-) Those final monsters tried to block the stairway, but the Barbarian hacked the way free.


Rewards:
Hosted a Play-by-Post game. Played a turn in a Play-by-Post game. Created a Hot Topic. Participated in four (4) Miniature Exchanges. Participated in three (3) Miniature Exchanges. Zealot Miniatures: Twisting Catacombs Kickstarter Backer Destroyed a Zombie! Encountered a menacing Chaos Warlock!
User avatar
Anderas
NOT Andreas!

Polar Warbear
Polar Warbear
 
Posts: 3397
Images: 73
Joined: September 20th, 2014, 7:02 am
Forum Language: British English
Hero:
Evil Sorcerer: Morcar
Usergroups:
Wizards of Zargon Group Member Adventurers' Guild Group Member Artists Group Member Champion Group Member

Re: Q10 Flee the Darkness: A New Found Enemy (part II)

Postby Daedalus » November 18th, 2018, 1:09 am

Anderas wrote:Okay.
That's my first rough try for a crumbling dungeon.

Wow!

Anderas wrote:Basically, there are three steps of crumbling, A, B and C, and they come turn-after-turn, some random time after you enter the room. I took care that no ways will be blocked forever and there is always a free square to move to. It will be difficult enough without death traps.

Findings: We have no properly visible numbers in Heroscribe, for Heroquest, so I resorted to Dwarf Quest numbers because they are still visible even when the room is completely crowded with Symbols. :-)

Do you mean Derfel Link's MiniIconNumbers weren't clear? Sad trombone. Would a color change help? Well, you found a way to make it stand out--that's most important.

Q10 - New Found Enemiers Part II wrote:Flee the Darkness!
After your disabling of the earth magic, you can hear a deep rumbling. Stones fall from the ceiling everywhere. Your way back is already blocked. Flee! Find a Way out before it is too late! Hurry Up!

It all works. I'd suggest some minor changes (in red). I used wording to match 90's NA Hero Quest.

    After disabling the earth magic, you now hear a deep rumbling. Stones fall from the ceiling everywhere. Your way back is already becoming blocked. Find a way out before it is too late! Flee!
[font=HQModern]Notes:
Play this quest directly after the last quest. Don't allow to go to the armory.

    Play this Quest directly after the last Quest. Body and Mind Points are fully restored, but Heroes may not visit the Armory.
This note can be placed.between the Quest Map and Parchment Text or under the Parchment Text but above NOTES. From the perspective of verisimilitude it might be better to award some healing potions or full healing at the alter of the previous Quest.

Anderas wrote:Numbers, A, B, C, Broken Wall tiles: The letters A, B and C represent places where the ceiling carves in, exactly like a falling Rock Trap; but with a different trigger. Note: Heroes with a helmet roll two dice less for damage if they are hit by falling stones (so they roll only one die).

Morcar, after the first hero enters any new room, take a counter at the beginning of each of your turns. Then roll a red die and add the number of counters:
If the result is higher than number of this room, this room starts to crumble.
* Remove all Counters. (Restart with the next room)
* Place rubble markers on all squares marked "A" with the rules for Falling Rock Traps.
* The turn after "A" was triggered, place Rubble markers on all squares marked "B" with the rules for falling Rock Traps. Also place the broken wall tiles now.
* The turn after "B" was triggered, place Rubble markers on all squares marked "C" with the rules for falling Rock Traps.
* The turn after "C" was triggered, remove the entire room. Each Monster and Hero still in this room are dead.
* If, at any time, all Heroes are already in the next room, also remove the last room as if it has crumbled after stage C.

If you're interested, I've reworded the Quest Notes in a format similar to the published Quests. I added in and changed some stuff. Notably, I extended the chance that a crumbling room could be escaped. My thought was it would suck to be buried, but being automatically knocked on the head a couple of times would be enough to send any Hero running for the exit.

I also added skull tiles for the counters as the design document called for ready-to-play components from the Game System. (Otherwise they gotta be printed.) Also, I felt there was a real possibility Heroes could be split between two rooms with separate timer counts, so the counters are set next to the rooms.

    NOTES:
    Squares marked with the letters A, B and C represent where the ceiling caves in. These work like a falling block traps but with a different trigger. Note: A Hero with a helmet need only roll one die for damage if he is hit by falling stones.

    At the beginning of each of your (Zargon's) turns after a room is first entered by a Hero, place a skull tile next to it and roll a red die. Add in the count of the skull tiles and compare this result to the number of the room found on the map. If the die result is greater, the ceiling starts to crumble. Return the skull tiles for the room to the box.

    Now place falling block trap tiles on all squares marked "A", using the rules for sprung falling-block traps. The turn after any "A" squares have been triggered, spring falling block trap tiles on all squares marked "B." Also place any broken wall tiles in the room. On the next turn, squares marked "C" are also sprung. On the turns following that, any square that begins with a Hero or monster in it springs a falling block trap.

    Once all Heroes are out of the room, it collapses. Place blocked square tiles within all exits and return any inaccessible tiles to the box.


    The Gargoyle represents the King of Dawn. It has the stats of a normal Gargoyle.

    Wandering Monster in this Quest: The Hero loses 1 Body Point due to stones falling from the ceiling.
..
UNCLE ZARGON
Image
WANTS.. YOU


Rewards:
Wizard of Zargon Group Member Grin's Stone Map Played a turn in five (5) Play-by-Post games. Created a Hot Topic. Slain a measly Goblin! Slaughtered an Orc! Killed a mighty Fimir! Shattered a Skeleton! Destroyed a Zombie! Unravelled a Mummy!Crushed a powerful Chaos Warrior! Smashed a massive Gargoyle! Encountered all eight (8) Game System monsters. Encountered a menacing Chaos Warlock!
User avatar
Editor-in-Chief
Daedalus
Dread Ruleslawyer

Wizard
Wizard
 
Posts: 5332
Images: 14
Joined: May 9th, 2011, 2:31 pm
Forum Language: English (United States)
Evil Sorcerer: Zargon
Usergroups:
Wizards of Zargon Group MemberScribes Group MemberAdventurers' Guild Group MemberArtists Group MemberChampion Group Member

Re: Q10 Flee the Darkness: A New Found Enemy (part II)

Postby Anderas » November 22nd, 2018, 11:27 am

Woah, lots of red! :shock: :lol:

I copied and pasted your corrections to the quest text above. Thanks for that, Daedalus.


Rewards:
Hosted a Play-by-Post game. Played a turn in a Play-by-Post game. Created a Hot Topic. Participated in four (4) Miniature Exchanges. Participated in three (3) Miniature Exchanges. Zealot Miniatures: Twisting Catacombs Kickstarter Backer Destroyed a Zombie! Encountered a menacing Chaos Warlock!
User avatar
Anderas
NOT Andreas!

Polar Warbear
Polar Warbear
 
Posts: 3397
Images: 73
Joined: September 20th, 2014, 7:02 am
Forum Language: British English
Hero:
Evil Sorcerer: Morcar
Usergroups:
Wizards of Zargon Group Member Adventurers' Guild Group Member Artists Group Member Champion Group Member

Re: Q10 Flee the Darkness: A New Found Enemy (part II)

Postby j_dean80 » November 22nd, 2018, 12:03 pm

Needs a note for using the room tiles.
Blood - Good to the last drop

Ye Olde Inn Quest Design Competition 2024 Joint Winner


Rewards:
Participated in four (4) Miniature Exchanges. Participated in three (3) Miniature Exchanges. Wrote an article for the Blog. Grin's Stone Map Destroyed a Zombie! Encountered a menacing Chaos Warlock!
User avatar
j_dean80

Ice Gremlin
Ice Gremlin
 
Posts: 2413
Images: 30
Joined: December 6th, 2016, 2:48 pm
Location: Illinois, USA
Forum Language: English (United States)
Hero:
Evil Sorcerer: Zargon
Usergroups:
Scribes Group MemberAdventurers' Guild Group MemberArtists Group MemberChampion Group Member

Re: Q10 Flee the Darkness: A New Found Enemy (part II)

Postby Anderas » November 22nd, 2018, 12:06 pm

j_dean80 wrote:Needs a note for using the room tiles.


I just looked up KK and ATOH, it is not mentioned in the quest notes there. It is mentioned in the beginning of the book, where the symbols are introduced, and then they just use them.


Rewards:
Hosted a Play-by-Post game. Played a turn in a Play-by-Post game. Created a Hot Topic. Participated in four (4) Miniature Exchanges. Participated in three (3) Miniature Exchanges. Zealot Miniatures: Twisting Catacombs Kickstarter Backer Destroyed a Zombie! Encountered a menacing Chaos Warlock!
User avatar
Anderas
NOT Andreas!

Polar Warbear
Polar Warbear
 
Posts: 3397
Images: 73
Joined: September 20th, 2014, 7:02 am
Forum Language: British English
Hero:
Evil Sorcerer: Morcar
Usergroups:
Wizards of Zargon Group Member Adventurers' Guild Group Member Artists Group Member Champion Group Member


Return to HQ25th Quests

Who is online

Users browsing this forum: No registered users and 0 guests