Wicked!!!
In photoshop only, simply using paint bucket on the background for the lighter shade and you're there.
-
- Advertisement
Make a small donation to Ye Olde Inn!
Every cent received goes toward Ye Olde Inn's maintenance and allows us to continue providing the best resources for HeroQuest and Fantasy Gaming fans.
[Tutorial] - Card Images
24 posts
• Page 3 of 3 • 1, 2, 3
-
Prince
mitchiemasha
Halberdier
- Posts: 1473
- Joined: August 14th, 2014, 2:05 am
- Forum Language: British English
- Hero:

- Evil Sorcerer: Morcar
- Usergroups:

Advertisement
Make a small donation to Ye Olde Inn!
Every cent received goes toward Ye Olde Inn's maintenance and allows us to continue providing the best resources for HeroQuest and Fantasy Gaming fans.
Re: [Tutorial] - Card Images
![]() by sorcerersapprentice » September 3rd, 2015, 2:21 pm
by sorcerersapprentice » September 3rd, 2015, 2:21 pm
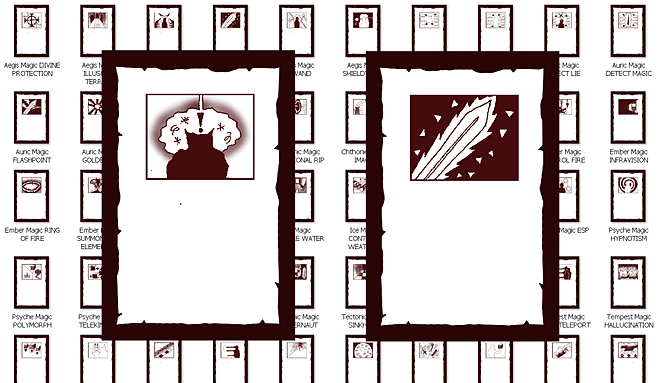
For those HQ-fans out there who have difficulty drawing. Take heart. You don't need to import fancy images to get a solid Heroquesty feel and effect. These images have all been hand-drawn by me. I drew them in pencil and then went over them with a 0.4mm artline pen so the computer would pick the lines up. I scanned them in 300dpi in black and white and then opened them in GIMP (Photoshop). Because I selected to scan them in black and white and drew clean lines, I was able to select by colour and choose all of the white. Then I inverted my selection so it captured all of the black ink. I then selected a suitably coloured dark brown paint and enlarged my brush and went over the whole selection changing them to a nice HQ brown. After that I zoomed in and made sure the lines were not left open and all connected so that by selecting various areas I could just wave my brush over them to fill them in. Whilst not as carefully shaded or detailed as the original Heroquest spell card images, I think they have a certain simplistic charm - and can create dozens of them in a short amount of time.
PS - the backcard template is custom-made. I more or less made a white rectangle, gave it a rectangle border and coloured it brown. I then moved the image into the program Paint and added some triangles jutting out of the edges. I then moved it back into GIMP and used the free-select tool to move along the edge dipping into the brown on slight angles joined it back to itself and filled it with white to help give it that scrolly look. Finally I used a round brush to just slightly overlap the white interior with brown.
[Edit: you can download my template freely here to use in your projects. http://gametilewarehouse.wix.com/rpgtilesupply#!heroquest-fun--freebies/c111s
-

sorcerersapprentice
Ogre Lord
- Posts: 260
- Images: 3
- Joined: June 25th, 2015, 10:29 am
- Location: Australia
- Forum Language: British English
- Hero:

- Evil Sorcerer: Zargon
- Usergroups:
Re: [Tutorial] - Card Images
![]() by Spookyhappyfun » August 7th, 2017, 3:00 pm
by Spookyhappyfun » August 7th, 2017, 3:00 pm
drathe, you've done some amazing work here, showing us all how to achieve this incredible effect. Thank you!
Sorcerersapprentice, it looks like it's been a little while and that link doesn't work. Do you still have these images anywhere?
Thanks!
sorcerersapprentice wrote:
For those HQ-fans out there who have difficulty drawing. Take heart. You don't need to import fancy images to get a solid Heroquesty feel and effect. These images have all been hand-drawn by me. I drew them in pencil and then went over them with a 0.4mm artline pen so the computer would pick the lines up. I scanned them in 300dpi in black and white and then opened them in GIMP (Photoshop). Because I selected to scan them in black and white and drew clean lines, I was able to select by colour and choose all of the white. Then I inverted my selection so it captured all of the black ink. I then selected a suitably coloured dark brown paint and enlarged my brush and went over the whole selection changing them to a nice HQ brown. After that I zoomed in and made sure the lines were not left open and all connected so that by selecting various areas I could just wave my brush over them to fill them in. Whilst not as carefully shaded or detailed as the original Heroquest spell card images, I think they have a certain simplistic charm - and can create dozens of them in a short amount of time.
PS - the backcard template is custom-made. I more or less made a white rectangle, gave it a rectangle border and coloured it brown. I then moved the image into the program Paint and added some triangles jutting out of the edges. I then moved it back into GIMP and used the free-select tool to move along the edge dipping into the brown on slight angles joined it back to itself and filled it with white to help give it that scrolly look. Finally I used a round brush to just slightly overlap the white interior with brown.
[Edit: you can download my template freely here to use in your projects. http://gametilewarehouse.wix.com/rpgtilesupply#!heroquest-fun--freebies/c111s
Sorcerersapprentice, it looks like it's been a little while and that link doesn't work. Do you still have these images anywhere?
Thanks!
My Rules Addendum
My Quest Book Edits - In Progress
My Quest Locations - In Progress
My Current Play Order - In Progress
My Quest Book Edits - In Progress
My Quest Locations - In Progress
My Current Play Order - In Progress
Rewards:


- Spookyhappyfun
Elven Warrior
- Posts: 606
- Joined: July 26th, 2017, 7:12 am
- Location: North Carolina, US
- Forum Language: English (United States)
- Hero:
- Evil Sorcerer: Zargon
- Usergroups:
Re: [Tutorial] - Card Images
![]() by runnar » August 13th, 2021, 4:59 pm
by runnar » August 13th, 2021, 4:59 pm
This tutorials are amazing! I wish I could have found them sooner, it would have saved me a lot of work!
-

runnar
Fimir
- Posts: 52
- Images: 106
- Joined: October 14th, 2016, 7:25 pm
- Forum Language: Português (Brasil)
- Hero:

- Evil Sorcerer: Zargon
24 posts
• Page 3 of 3 • 1, 2, 3
Who is online
Users browsing this forum: No registered users and 1 guest