-
- Advertisement
Make a small donation to Ye Olde Inn!
Every cent received goes toward Ye Olde Inn's maintenance and allows us to continue providing the best resources for HeroQuest and Fantasy Gaming fans.
The Tyrant's Tomb - a solo quest pack
Re: The Tyrant's Tomb - a solo quest pack
![]() by Pancho » November 11th, 2019, 4:46 am
by Pancho » November 11th, 2019, 4:46 am
 Miniature Exchanges.")
-

Pancho
Rock Skin Achieved
Halberdier
- Posts: 1277
- Joined: April 12th, 2017, 10:43 am
- Forum Language: British English
- Hero:

- Evil Sorcerer: Morcar
- Usergroups:


Advertisement
Make a small donation to Ye Olde Inn!
Every cent received goes toward Ye Olde Inn's maintenance and allows us to continue providing the best resources for HeroQuest and Fantasy Gaming fans.
Re: The Tyrant's Tomb - a solo quest pack
![]() by Pancho » November 15th, 2019, 6:15 am
by Pancho » November 15th, 2019, 6:15 am
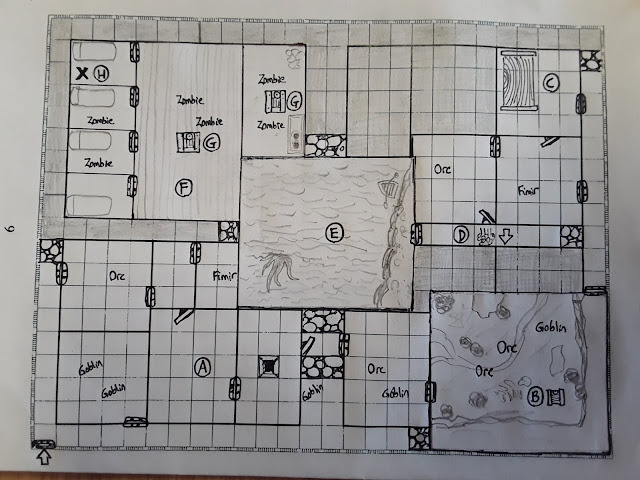
Quest 2 - The Sea of Claws
The Barbarian's Tale...
"You are a Barbarian of Valringia, counted amongst the mightiest of warriors. In former days, when but a boy, you stood in defence of the Hall with the other thanes, even when those older than you took fright and hid amongst their mothers skirts. As a youth you went with spear and sword up into the fells, there to deal harshly with a night-gaunt that had preyed upon your fathers herd; it ate no more cattle after that. By the time you had spent your first summer as a grown man, you had travelled south across the sea to seek adventure and glory. The death of many fierce foes is accounted to your name!
Yet now your homeland calls to you. Many strange tales have reached your ears recently, ill news concerning events in Norsca. The orcs have been very agitated, making war against themselves, the Valringia, and the other Barbarian tribes. Stories abound of the awakening of the dead, of demons and bizarre monsters. The elders of your tribe have sent word that the Fimbul-winter draws near, an eternal frost that will cover all the world.
You must return to Norsca and confront the evils plaguing your people. Fight your way north across the Enchanted Hills until you reach the coast. From there you may hope to gain passage by ship across the Sea of Claws..."
Notes - This is a solo Quest for the Barbarian Hero. He has the same stats as a starting Barbarian, and is armed with a Broadsword and a Spear. This quest begins in the Enchanted Hills, a remote region in the north of the Empire bordering the Sea of Claws..
A - An Elf knight stands here. Use the Elf Hero model - move 8, attack 2, Defend 3, Body 4, Mind 3 (he defends on black shields). He accuses the Barbarian of trespass and demands tribute. If the player does not give up one item (either a piece of equipment, a potion, or all of the gold he has collected so far, the Elf knight will attack him. However, as soon as the knight inflicts one or more Body points of damage he will declare that "honour is served" and step back. The knight remains here, allowing the barbarian to pass through. If the barbarian wishes to continue the duel, and slays the elf, he may take his shield.
B - Use the outdoor tile from Against the Ogre Horde here. The chest contains the orcs belongings; mostly old junk, but deep down in the bottom are two potions of healing that will each restore up to 4 lost Body Points.
C - This is a Goblin market. The Goblin here is a merchant who will not attack, but instead offer his wares for sale. The Barbarian may buy any of the following items, which he should mark on his Character Sheet; Rope 25gc, Lantern 30gold, Warm Furs 20gc, Sprig of Garlic 10gc, Holy Water 50gc, Healing Salve 50gc (will restore 2BP), Genie in a bottle 60gc (the same as a Genie spell scroll). If the Hero attacks the goblin or attempts to steal anything, the entire market and the merchant will disappear into thin air.
D - The falling block trap is actually a large rotten tree that collapses into the square marked with an arrow when the trap is triggered. It does no damage, but it startles a flock of angry ravens ; each turn that the barbarian remains in the corridor he will be attacked by the birds, which collectively roll one combat die. The birds are too numerous to kill.
E - Use the coastline tile here. Tell the barbarian that he has reached the coast of the Sea of Claws. The only ship to be seen has an ominous look about it, with black sails and a figurehead in the form of a cackling crows head. Hooded sailors beckon to the barbarian from its deck. As there is no way of knowing when the next ship might pass by, the barbarian has no choice but to call out across the water and ask for passage. Silent rowers hunched over like gravediggers row out in a small boat and take the barbarian over to their ship. Place the hero on the square marked F.
F - Use the Ye Old Inn corner tile here, placing a trap-door tile over the fire. This is the deck of the ghost ship Heldrasir. The two zombies are part of the crew, cursed to sail the sea forever. They attack the barbarian, hoping to force his reanimated corpse to labour in the ship's hull for all eternity. The barbarian must fight them off and then find a way out of this predicament.
G - This trap door leads down into the ships hull (the 5x3 room to the right). If the Barbarian searches for treasure down in the hull he will find the magic artefact Harpoon of the Heldrasir.
H - This is the ships undead overlord, Captain Athscar - Move 4, Attack 3, Defend 4, Body 3, Mind 0. Athscar is classed as undead, and if holy water is used against him it will cause 2 lost Body Points. Garlic has no effect. Any remaining Zombies on the ship will hang back and watch this fight without intervening, as they hate their Captain more than anything else, as he has kept them as slaves for centuries, doomed to know no rest. If Athscar is destroyed, all slain crew are reanimated. They will not attack the Barbarian as he has saved them from their curse. In gratitude they will perform one last duty, sailing the Barbarian across the Sea of Claws, before they go to their final rest.
The Quest is now completed.
Wandering monster - Goblin (or a Zombie if on board the Heldrasir).
-
Pancho
Rock Skin Achieved
Halberdier- Posts: 1277
- Joined: April 12th, 2017, 10:43 am
- Forum Language: British English
- Hero:
- Evil Sorcerer: Morcar
- Usergroups:
Re: The Tyrant's Tomb - a solo quest pack
![]() by Pancho » November 21st, 2019, 8:30 am
by Pancho » November 21st, 2019, 8:30 am
Lestodante, if you are reading this please note that the correct spelling for the Wand of Galimatias, is just like that rather than "Galimateus" like I wrote on page two of this thread. If you make this artefact card please write it as "Galimatias".

Quest 3 - Running the Gauntlet
The Wizard's Tale (continued)...
"You have been shipwrecked while crossing the Sea of Claws. Battered and half-drowned, you find yourself seized and brought to a gilded palace of great marble domes and towers. There you were nursed back to health, but despite the luxury of your surroundings you began to feel uneasy. Rather than being an honoured guest, it was as though you were being fattened for the kill.
Today your hosts came to you. They are tall men in long silk robes. From their lead-coloured skin and yellow eyes you suspect them to be Cabiri, a sorcerously powerful race descended from a union between men and sea-nymphs in ancient times. The Cabiri lords escort you to a stairway winding down into a labyrinth beneath their city. By telepathy they speak to you: 'below lies a great treasure, the Wand of Galimatias, a mighty wizard of ages past. Find it and return here. Then you will have proved yourself as a wizard and you will be free to leave our shores.
You attempt to explain that you are on an urgent mission to save the world, informing them of Kyrax and the dire threat the demon presents. The Cabiri do not seem in the least bit concerned and simply point down at the stairway. It seems you must do what they ask. You are grateful that your Familiar, Faustus, has also survived the shipwreck and now squeaks encouragement at you from his perch within the sleeve of your robe".
Notes - This is a solo Quest for the Wizard Hero. He has the same stats as a starting Wizard and may select any 3 of the elemental spell decks for this quest. He is armed with a dagger and also has his familiar Faustus (see introduction). To complete the quest the Wizard must find the Wand of Galimatias and return with it to the stairway, ideally with the Elf also in tow (see note F).
A - The Wizard Hero starts here in a room with 4 doors. Chiselled into the stone above each door is an inscription in the language of the Cabiri. The language is unknown to the Wizard, but shares a passing similarity with some of the tongues he has studied at Matholem's School of Magic. The Wizard may roll two red dice for each door in this room; if the result is the same as or lower than his Mind Point score, he can successfully translate the inscription. North door = "ALLY", East door = "AVOID", South door = "ARTEFACT", West door = "AIM".
The Wizard should only be allowed one attempt to translate each door. However, if he gets the Wand of Galimatias and increases his Mind Points, he can have one more attempt at each door.
B - Two goblins sit at dinner, stirring a bowl in which floats steaming human hearts. The item they are using to stir this gruesome feast is a fine-wrought artefact covered in runes. If the Hero searches for treasure here, he finds a Wand of Recall.
C - These two fimir are squatting on the ground playing knuckle-bones, and it will take them one turn to react to the Hero's appearance (getting up, grabbing their axes, etc), during which time he could either prepare for battle or turn and flee. If the Fimir are defeated, the Hero can take the 25 gold coins they were gambling with.
D - Use the bridge chasm tile from Against the Ogre Horde here. The gargoyle on the bridge will posture and growl, but will not actually attack the Hero until he steps on to the bridge himself or casts a spell on the gargoyle.
E - Tell the adventurer that the door here is unusually low and narrow - a human being could get through it, but a large monster such as a gargoyle or chaos warrior could not.
F - This is a torture-chamber where an orc is stretching an Elf on a rack (remember that the gargoyle, if in pursuit, cannot get through the door). Once the orc is slain, the Wizard will learn that the Elf on the rack is none other than the Elf Hero from quest 1. As the Wizard frees the Elf, the Elf explains how he was also shipwrecked on the island - the Cabiri deliberately wreck ships using their elemental magic, with the aim of using the survivors for their own ends. The Elf refused the Cabiri's demands and was therefore sent down here to be a plaything for the monsters in their dungeons.
The Elf seems to know all about the threat of Kyrax and joins the Wizard immediately. He suggests that the Wizard should keep the Wand of Galimatias as it will help them with their greater quest.
The Elf has full Body Points and one deck of Elf spells, but he has NONE of his equipment for this quest as it was taken by the Cabiri and is held in their palace tower.
G - Here, amid the clutter on the bench, lies the Wand of Galimatias. See the new artefact card for the effects of this powerful item. It may only be used by the Wizard Hero The Hero may also take 50 gold coins from the dead chaos warrior.
Once the Wand of Galimatias is discovered, the Wizard should return to the stairway. The quest is now over, unless the Hero wishes to explore one of the other doors (the Cabiri will be confronted in a later quest).
Wandering monster - Skeleton
-
Pancho
Rock Skin Achieved
Halberdier- Posts: 1277
- Joined: April 12th, 2017, 10:43 am
- Forum Language: British English
- Hero:
- Evil Sorcerer: Morcar
- Usergroups:
Re: The Tyrant's Tomb - a solo quest pack
![]() by lestodante » November 22nd, 2019, 12:31 pm
by lestodante » November 22nd, 2019, 12:31 pm
I like the way you re worked the enigma.
Are you sure the Cabiri must be fight in a successive quest? Here you have an Elf that can help you, but I don't know what will happen later. I'll wait...
About note D: if the Wizard will use Veil of Myst he can easily avoid the Gargoyle, correct?
Here's your wand for revision:


 Miniature Exchanges.")
 Miniature Exchanges.")

-

lestodante
Yeti
- Posts: 2705
- Images: 5
- Joined: January 7th, 2017, 9:40 am
- Location: Italy
- Forum Language: English (United States)
- Hero:
- Evil Sorcerer: Morcar
- Usergroups:

Re: The Tyrant's Tomb - a solo quest pack
![]() by Pancho » November 23rd, 2019, 2:45 pm
by Pancho » November 23rd, 2019, 2:45 pm
Yeah you’ll just have to wait and see what I do with the Cabiri
To be honest a big part of my reasoning is that I didn’t want two dwarf quests one after the other. The next quest will be for the dwarf as he hasn’t been introduced yet, then the Wizard and Elf will confront the Cabiri lords, then it’s back to the dwarf again, which will allow everyone to be in place for another Barbarian quest in quest 7.
Also, the Cabiri are enigmatic figures and I think they are interesting enough to star in their own quest if I do it right.
I’ve always thought that Veil of Mist was intended to be used to get past the gargoyle on the bridge. Why else would the note about the small narrow door be included? In the Screaming Spectre novel there is a section in the play-your-own adventure game where the Wizard can use veil of mist to hide from an archer shooting from a castle wall, so Morris has form for using this spell creatively. The big problem in Running the Gauntlet is that the narrow door comes after the gargoyle, so there is no way the Hero can plan ahead and use it. I think some players will cast Genie or sleep on the gargoyle rather than use veil of mist, but if then Wizard has already found the wand of Recall a good strategy could be use veil of mist and Swift Wind to get away from the gargoyle.
It’s all asking a bit much though really. This quest as originally written is a bit too hard to survive. However, with Faustus included, the simplified centre room puzzle, and the improvements to the Wand of Galimatias, I think the difficulty level is better now.
-
Pancho
Rock Skin Achieved
Halberdier- Posts: 1277
- Joined: April 12th, 2017, 10:43 am
- Forum Language: British English
- Hero:
- Evil Sorcerer: Morcar
- Usergroups:
Re: The Tyrant's Tomb - a solo quest pack
![]() by lestodante » December 5th, 2019, 5:49 pm
by lestodante » December 5th, 2019, 5:49 pm
Doeas the Gargoyle in room D got only 1 BP?
Are you doing also a quest for the Screaming Spectre novel? It is the only one I've read and I liked a lot. I wanted to make an artifact for the special glasses that allow the wizard Fortunato to check for invisible magic presence; they can be used to see magical traps that are usually not discovered by a normal search.
So, let's see what will follow next! The Dwarf is still waiting for his tale!
-
lestodante
Yeti- Posts: 2705
- Images: 5
- Joined: January 7th, 2017, 9:40 am
- Location: Italy
- Forum Language: English (United States)
- Hero:
- Evil Sorcerer: Morcar
- Usergroups:
Re: The Tyrant's Tomb - a solo quest pack
![]() by The Admiral » December 6th, 2019, 5:29 am
by The Admiral » December 6th, 2019, 5:29 am


- The Admiral
Halberdier- Posts: 1319
- Joined: April 8th, 2015, 7:31 am
- Forum Language: British English
- Hero:
- Evil Sorcerer: Zargon
- Usergroups:
Re: The Tyrant's Tomb - a solo quest pack
![]() by lestodante » December 6th, 2019, 2:34 pm
by lestodante » December 6th, 2019, 2:34 pm
Maybe the first 4 lines (Immediately upon acquiring the Wand, the Wizard may regain all spells he has used so far in this quest) could be written in the questbook notes only and not in the card (since this is supposed to happen only once, when the Wizard discover the wand for the first time) or maybe sacrifice the "It also grants the wielder 2 extra Mind Points", replacing it with the recovering 1 spell per quest ability.
-
lestodante
Yeti- Posts: 2705
- Images: 5
- Joined: January 7th, 2017, 9:40 am
- Location: Italy
- Forum Language: English (United States)
- Hero:
- Evil Sorcerer: Morcar
- Usergroups:
Re: The Tyrant's Tomb - a solo quest pack
![]() by Pancho » December 7th, 2019, 4:55 am
by Pancho » December 7th, 2019, 4:55 am
Also, the extra 2 minds points he gets might be crucial for when he returns to the centre room and has another go at the puzzle, as well as during later quests...
-
Pancho
Rock Skin Achieved
Halberdier- Posts: 1277
- Joined: April 12th, 2017, 10:43 am
- Forum Language: British English
- Hero:
- Evil Sorcerer: Morcar
- Usergroups:
Re: The Tyrant's Tomb - a solo quest pack
![]() by Pancho » December 7th, 2019, 5:42 am
by Pancho » December 7th, 2019, 5:42 am
That said, I would really like to put something from the novel in this pack, so we can say that we’ve covered all parts of all three books. I’m reading it again at the moment for ideas. The magical glasses are cool, so we could go with that. I would have to include them as an artefact in Running the Gauntlet, because they would be useful in the next quest against the Cabiri (I like your idea about detecting magical traps).
Could you make an artefact card for these glasses?
It should be something like;
“Scrying-Glass -
This lens of green crystal will allow you to “see” magic as a flickering aura or nimbus, invisible to the naked eye. As an action, the Hero may search a room or corridor for magical traps that cannot normally be searched for.”
-
Pancho
Rock Skin Achieved
Halberdier- Posts: 1277
- Joined: April 12th, 2017, 10:43 am
- Forum Language: British English
- Hero:
- Evil Sorcerer: Morcar
- Usergroups:
Who is online
Users browsing this forum: No registered users and 1 guest